들어가기
이번 프로젝트의 목적은 State Management를 피부로 느껴보는 것이다. 따라서 기상철 날씨 파싱앱을 만들면서 두 가지 방법으로 만들었는데, 첫 번째는 State Management Packages를 안 쓰고 만드는 것이고, 두번째는 State Management Packages를 써서 만들어보는 방법이다. 이 시리즈를 보시는 분들도 나와 같이 State Management의 중요성을 체감하셨으면 좋겠다.
잘못된 내용은 언제든지 밑의 댓글로 알려주세요!
시리즈 2편은 여기서 보실 수 있습니다.
1. State Management란?
그렇다면 State Management란 무엇을 말하는 것일까? 먼저 flutter 공식 문서에서는 다음과 같이 State를 정의하고 있다.
The State of an App is everything that exists in memory when the app is running.
공식 문서에는 꽤 긴 문장으로 State를 설명하고 있으나, State는 한 마디로 앱이 돌아가는 동안 메모리에 존재하는 모든 데이터라고 할 수 있다. 여기서 말하는 데이터는 Flutter UI가 담고있는 모든 변수로, fonts, animation 등이 전부 포함된다.
그렇다면 Flutter에서 State는 왜 중요한 것일까? 그 이유는 Flutter UI는 State에 의해 rebuild되기 때문이다. 즉 다시말하면, Flutter App은 UI의 State가 변하면 UI를 다시 rebuild 한다. 따라서 Flutter 공식문서에서는 위의 State 정의 대신에 다음의 정의를 더 권장하고 있다.
State is whatever data you need in order to rebuild your UI at any moment in time
따라서 Flutter UI가 State의 변화에 따라 적절하게 build되게 하려면, UI Screen별로 동일한 State의 상태를 공유하기도 해야하고, 전달받기도 해야한다. 이때, 앱이 작으면 State를 관리할 필요 없이 주먹구구식으로 하면 되지만 앱이 커지면 좀 더 체계적인 방법으로 State를 관리해야 한다. 그리고 이 관리의 과정을 한 단어로 State Management라고 한다.
나는 이번 프로젝트의 State Management를 위해 get과 provider를 사용했다. 그렇다면 지금부터 차근차근 살펴보자.
2. 기상청에서 데이터를 가져와보자.
먼저 기상철 날씨 파싱앱을 만들기 위해서는 기상청 홈페이지로부터 날씨 데이터를 가져오는 것이 중요하다. 지금부터 기상청 날씨누리에 있는 기상 정보를 가져와보자.
2-1. 크롬 개발자 네트워크 도구 활용
나도 그랬듯이 처음 크롤링을 하시는 분들이라면 남들이 알려준대로 똑같이 했는데 빈 데이터가 긁어져오는 경험을 많이 해봤을 것이다. 그 이유는 쉽게 말하자면 데이터가 보여지는 링크와 데이터를 가져오는 링크가 다르기 때문이다. 딱 기상청이 이런 유형의 사이트에 속한다고 보면 된다. 이런 경우 크롬의 개발자 네트워크 도구를 활용하면 쉽게 사이트의 데이터가 어디로부터 오는지 파악할 수 있다. 그럼 어떻게하는지 살펴보자.
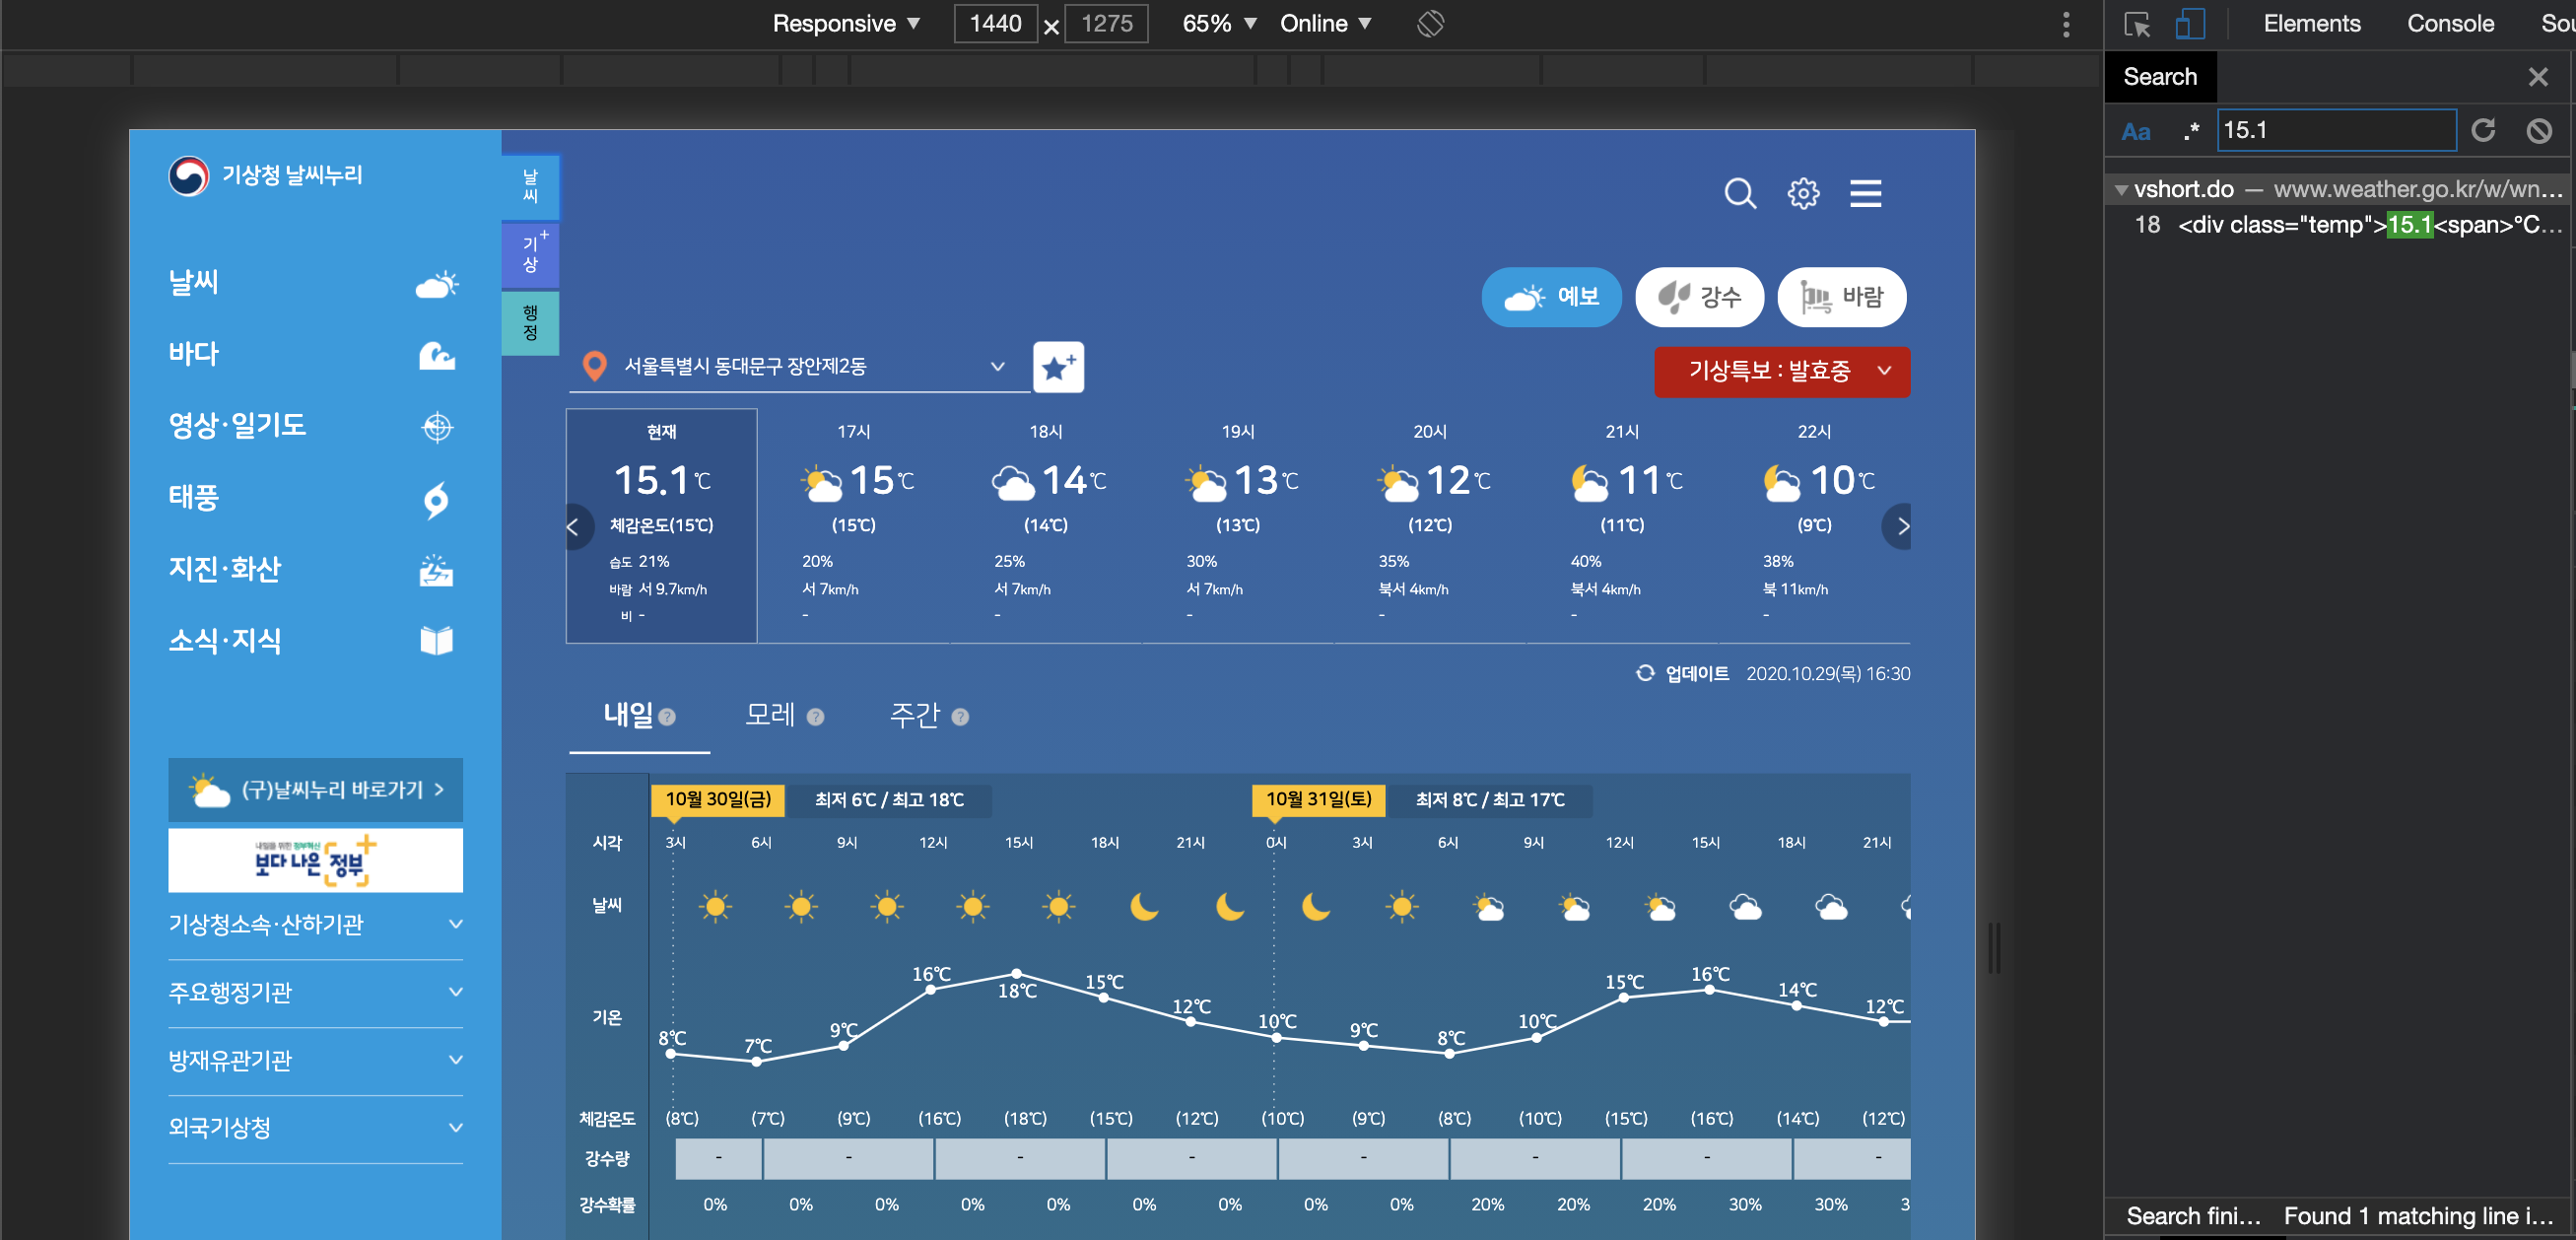
- 크롬 개발자 네트워크 도구를 연다.
- 개발자 도구의 Search Tap에 사이트의 유니크한 값을 검색한다.
이런 과정을 거치면 Search Tap 하단에 검색값이 나오고 위에 커서를 가져다 대면 지금 사이트와는 또 다른 사이트 주소를 하나 발견할 수 있다. 바로 그 사이트가 현재 사이트가 데이터를 가져오는 사이트이다. 해당 값을 복사하면 사이트의 링크를 얻을 수 있으니 복사하여 해당 사이트로 이동한다. 그럼 바로 이 사이트가 우리가 크롤링을 해야하는 사이트이다.
Tip. 크롤링이 되는지 안되는지 추가로 확인할 수 있는 방법.
해당 사이트가 크롤링이 가능한 사이트인지 잘 모르겠는 경우 크롬 개발자 도구의 Console 창에 다음의 코드를 쳐보면 된다.
1
document.querySelectorAll('데이터 Selector Path').forEach((e) => console.log(e.textContent))
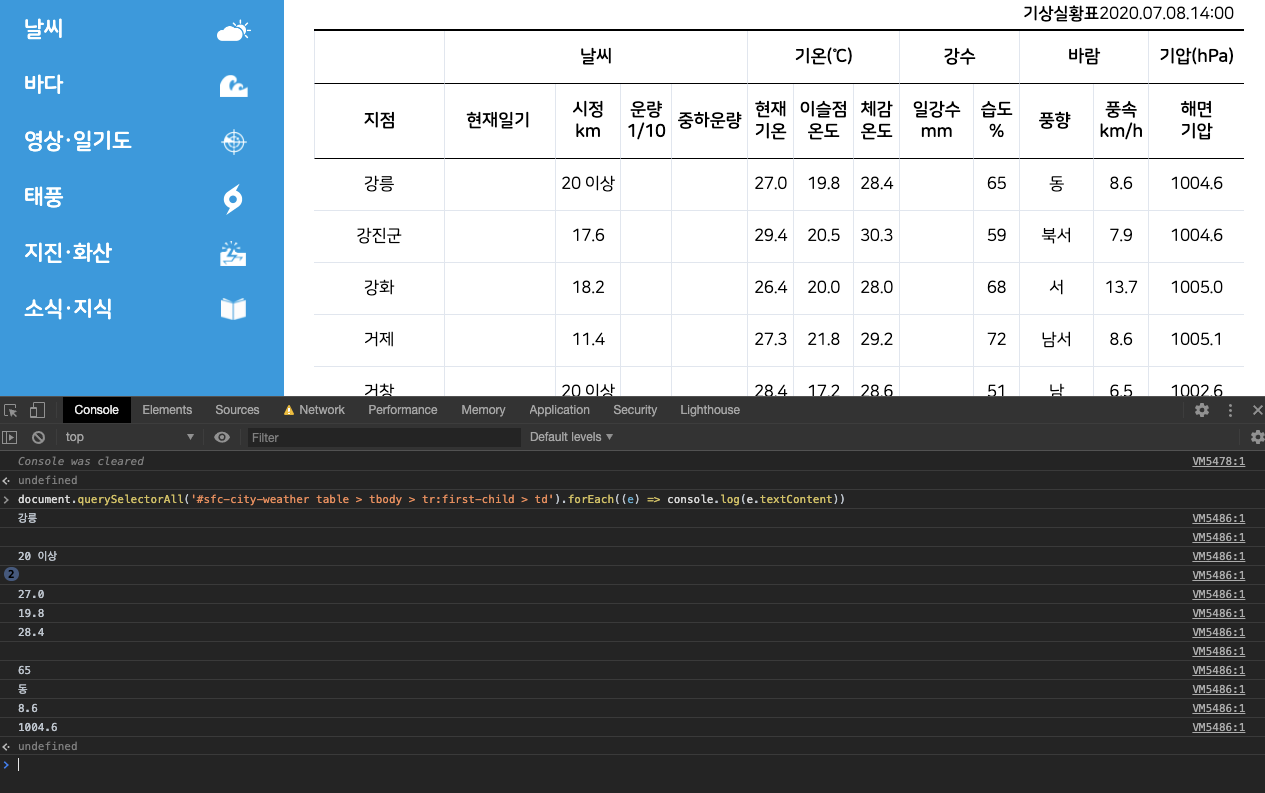
코드를 쳤을 시 위의 그림처럼 내가 원하는 크롤링 데이터가 나오면 해당 사이트는 문제 없이 크롤링이 가능한 사이트이다.
3. 날씨 데이터 모델 만들기
플러터는 기본적으로 자바와 매우 비슷한 언어인 dart를 사용하고 있기때문에 객체 활용을 적극 권장하고 있다. 따라서 우리가 필요한 날씨 데이터를 따로 dart 객체로 생성해주겠다.
1
2
3
4
5
6
7
8
9
10
11
12
13
14
15
16
17
18
class WeatherInfo {
  final String time;
  final String temp;
  final String feelTemp;
  final String humid;
  final String windDirection;
  final String windSpeed;
  final String rainfall;

  WeatherInfo(
      {this.time,
      this.temp,
      this.feelTemp,
      this.humid,
      this.windDirection,
      this.windSpeed,
      this.rainfall});
}
날씨 파싱앱에서 기본적으로 보여줄 데이터는 시간(time), 온도(temp), 체감온도(feelTemp), 습도(humid), 풍향(windDirection), 풍속(windSpeed), 강수량(rainfall)이다. 따라서 이 데이터 변수들을 가지고 있는 WeatherInfo 객체를 만들었다.
4. 날씨 데이터 크롤링
이제 기상청 데이터를 크롤링해서 위의 객체에 담기 위한 작업을 진행해보자.
1
2
3
4
5
6
7
8
9
10
11
12
13
14
15
16
17
18
19
20
21
22
23
24
25
26
27
28
29
30
31
32
33
34
35
import 'package:http/http.dart' as http;
import 'package:html/parser.dart' as parser;
import 'package:html/dom.dart' as dom;
import '../model/weatherModel.dart';

Future<List<WeatherInfo>> getNowWeather({locationCode}) async {
  List<WeatherInfo> weatherData = [];
  List<String> rawWeatherData = [];

  final String url =
      'https://www.weather.go.kr/w/wnuri-fct/weather/today-vshortmid.do?code=$locationCode&unit=km%2Fh';

  final http.Response response = await http.get(url);
  dom.Document document = parser.parse(response.body);

  document
      .getElementsByClassName('weather-item')
      .forEach((dom.Element element) {
    rawWeatherData =
        element.text.replaceAll(RegExp(r"\s+"), ',').split(',').toList();
    rawWeatherData.removeAt(0);
    rawWeatherData.removeLast();

    weatherData.add(WeatherInfo(
        time: rawWeatherData[0],
        temp: rawWeatherData[1],
        feelTemp: rawWeatherData[2],
        humid: rawWeatherData[3],
        windDirection: rawWeatherData[4],
        windSpeed: rawWeatherData[5],
        rainfall: rawWeatherData[6]));
  });

  return weatherData;
}
크롤링 하는 과정은 별도로 설명하지 않겠다. 지금까지의 과정을 통해 기상청의 데이터를 weatherData객체에 담았다. 이제 본격적으로 이 데이터를 앱의 UI에서 보여주도록 하자.
5. 앱 UI 구조
먼저 지금 만들고 있는 기상앱의 UI는 크게 세 부분이다.
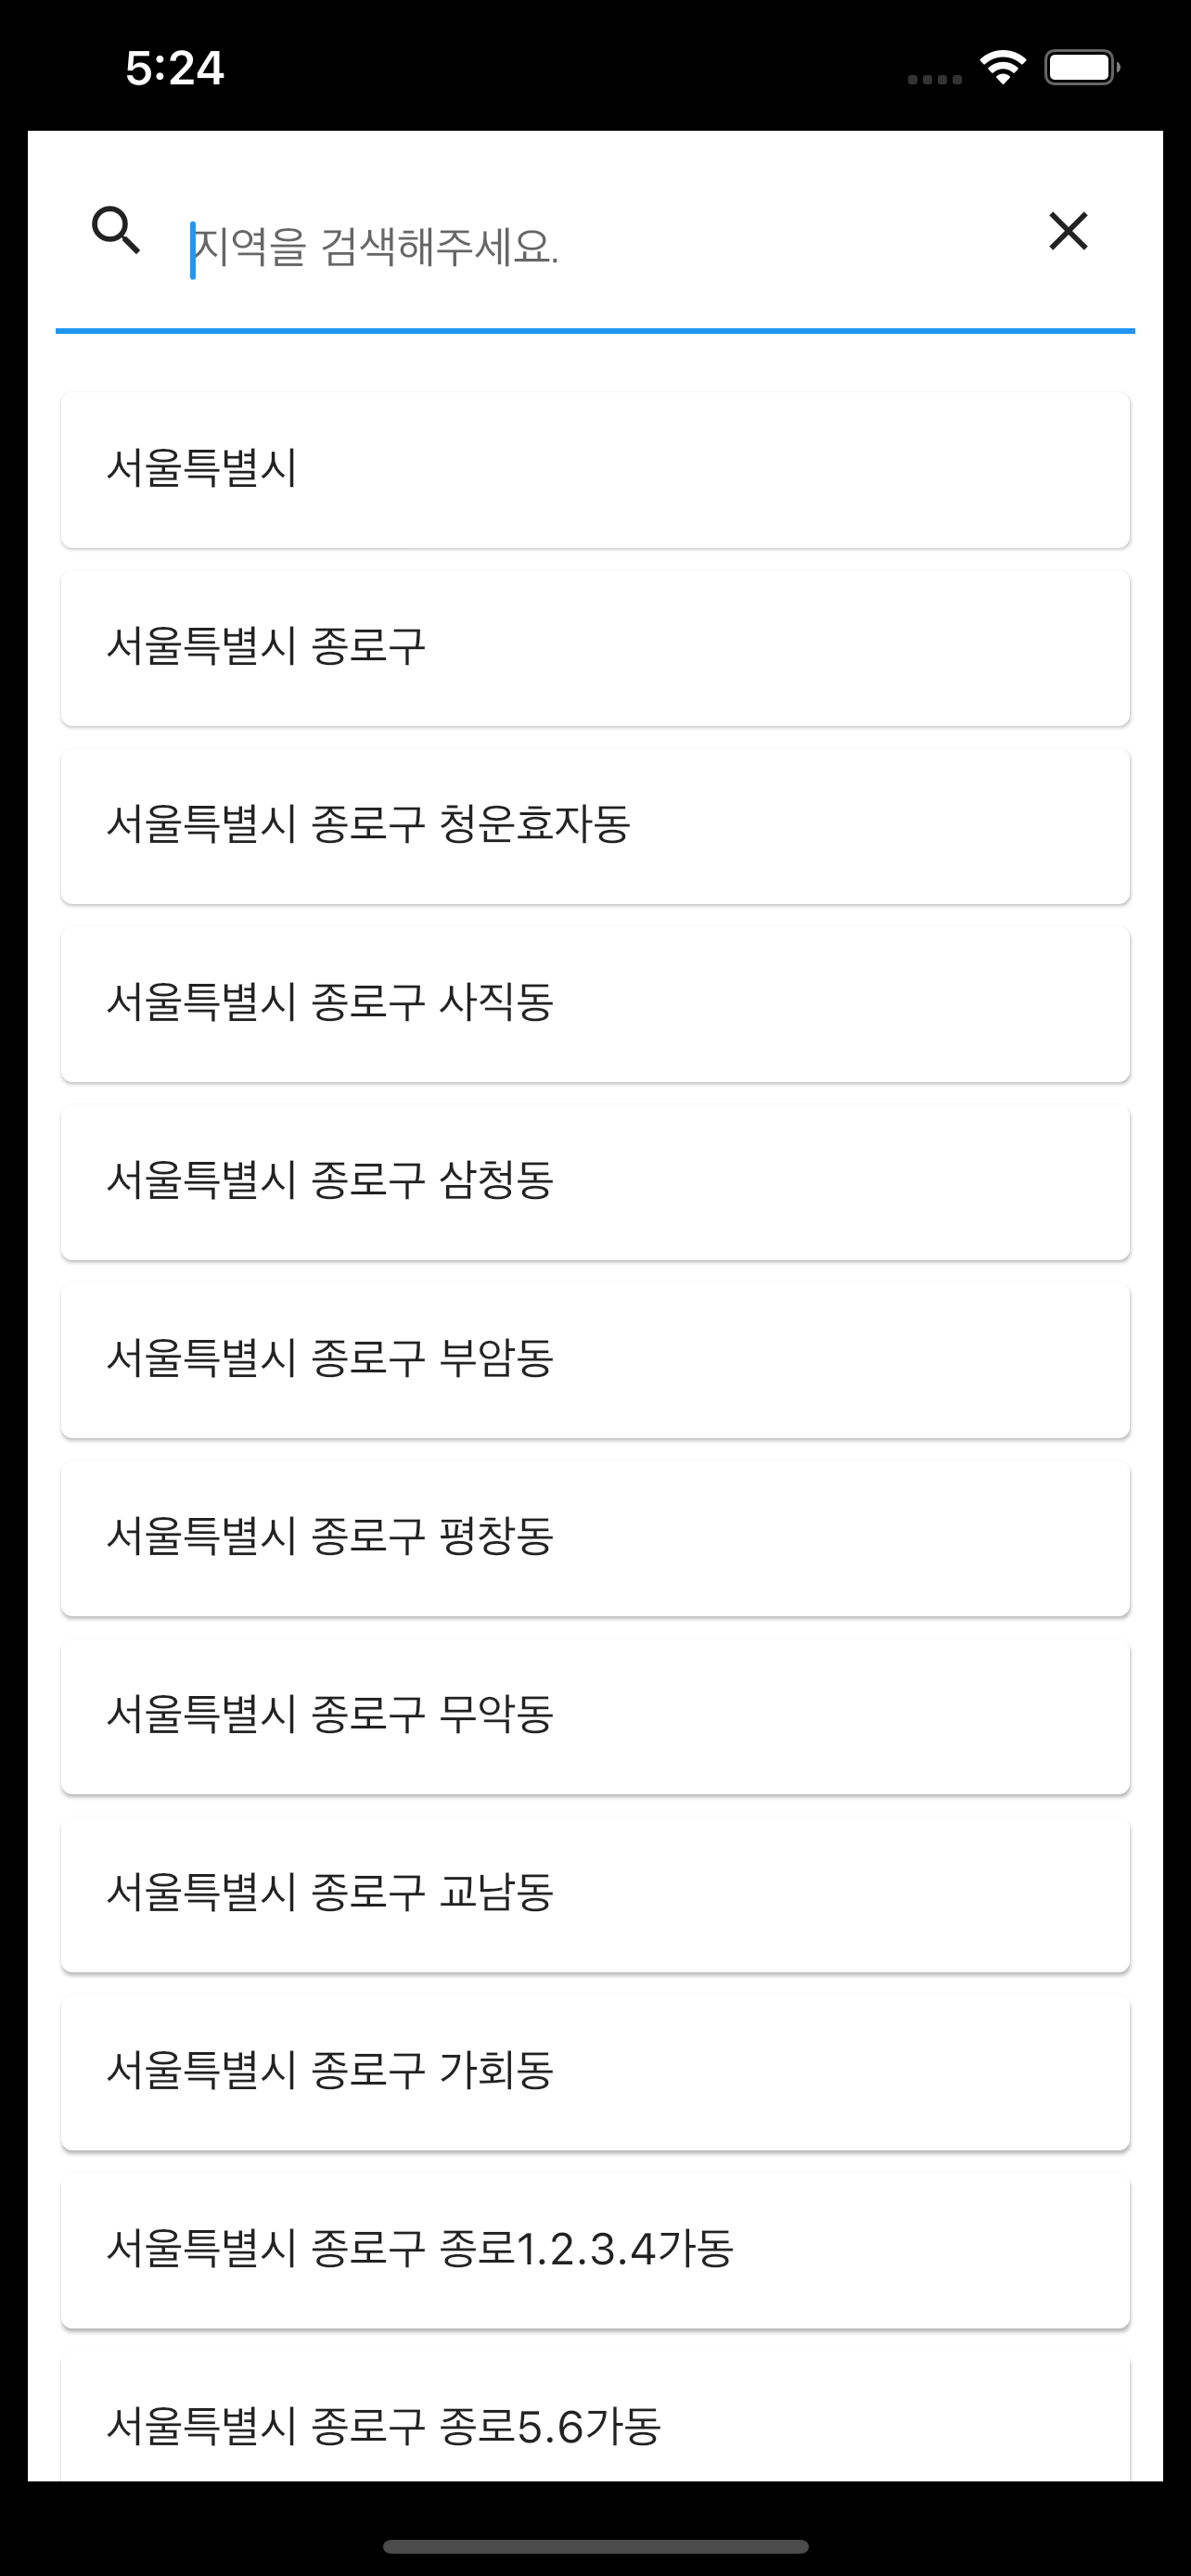
| 메인 Page | Search Page | Result Page |
|---|---|---|
 |
 |
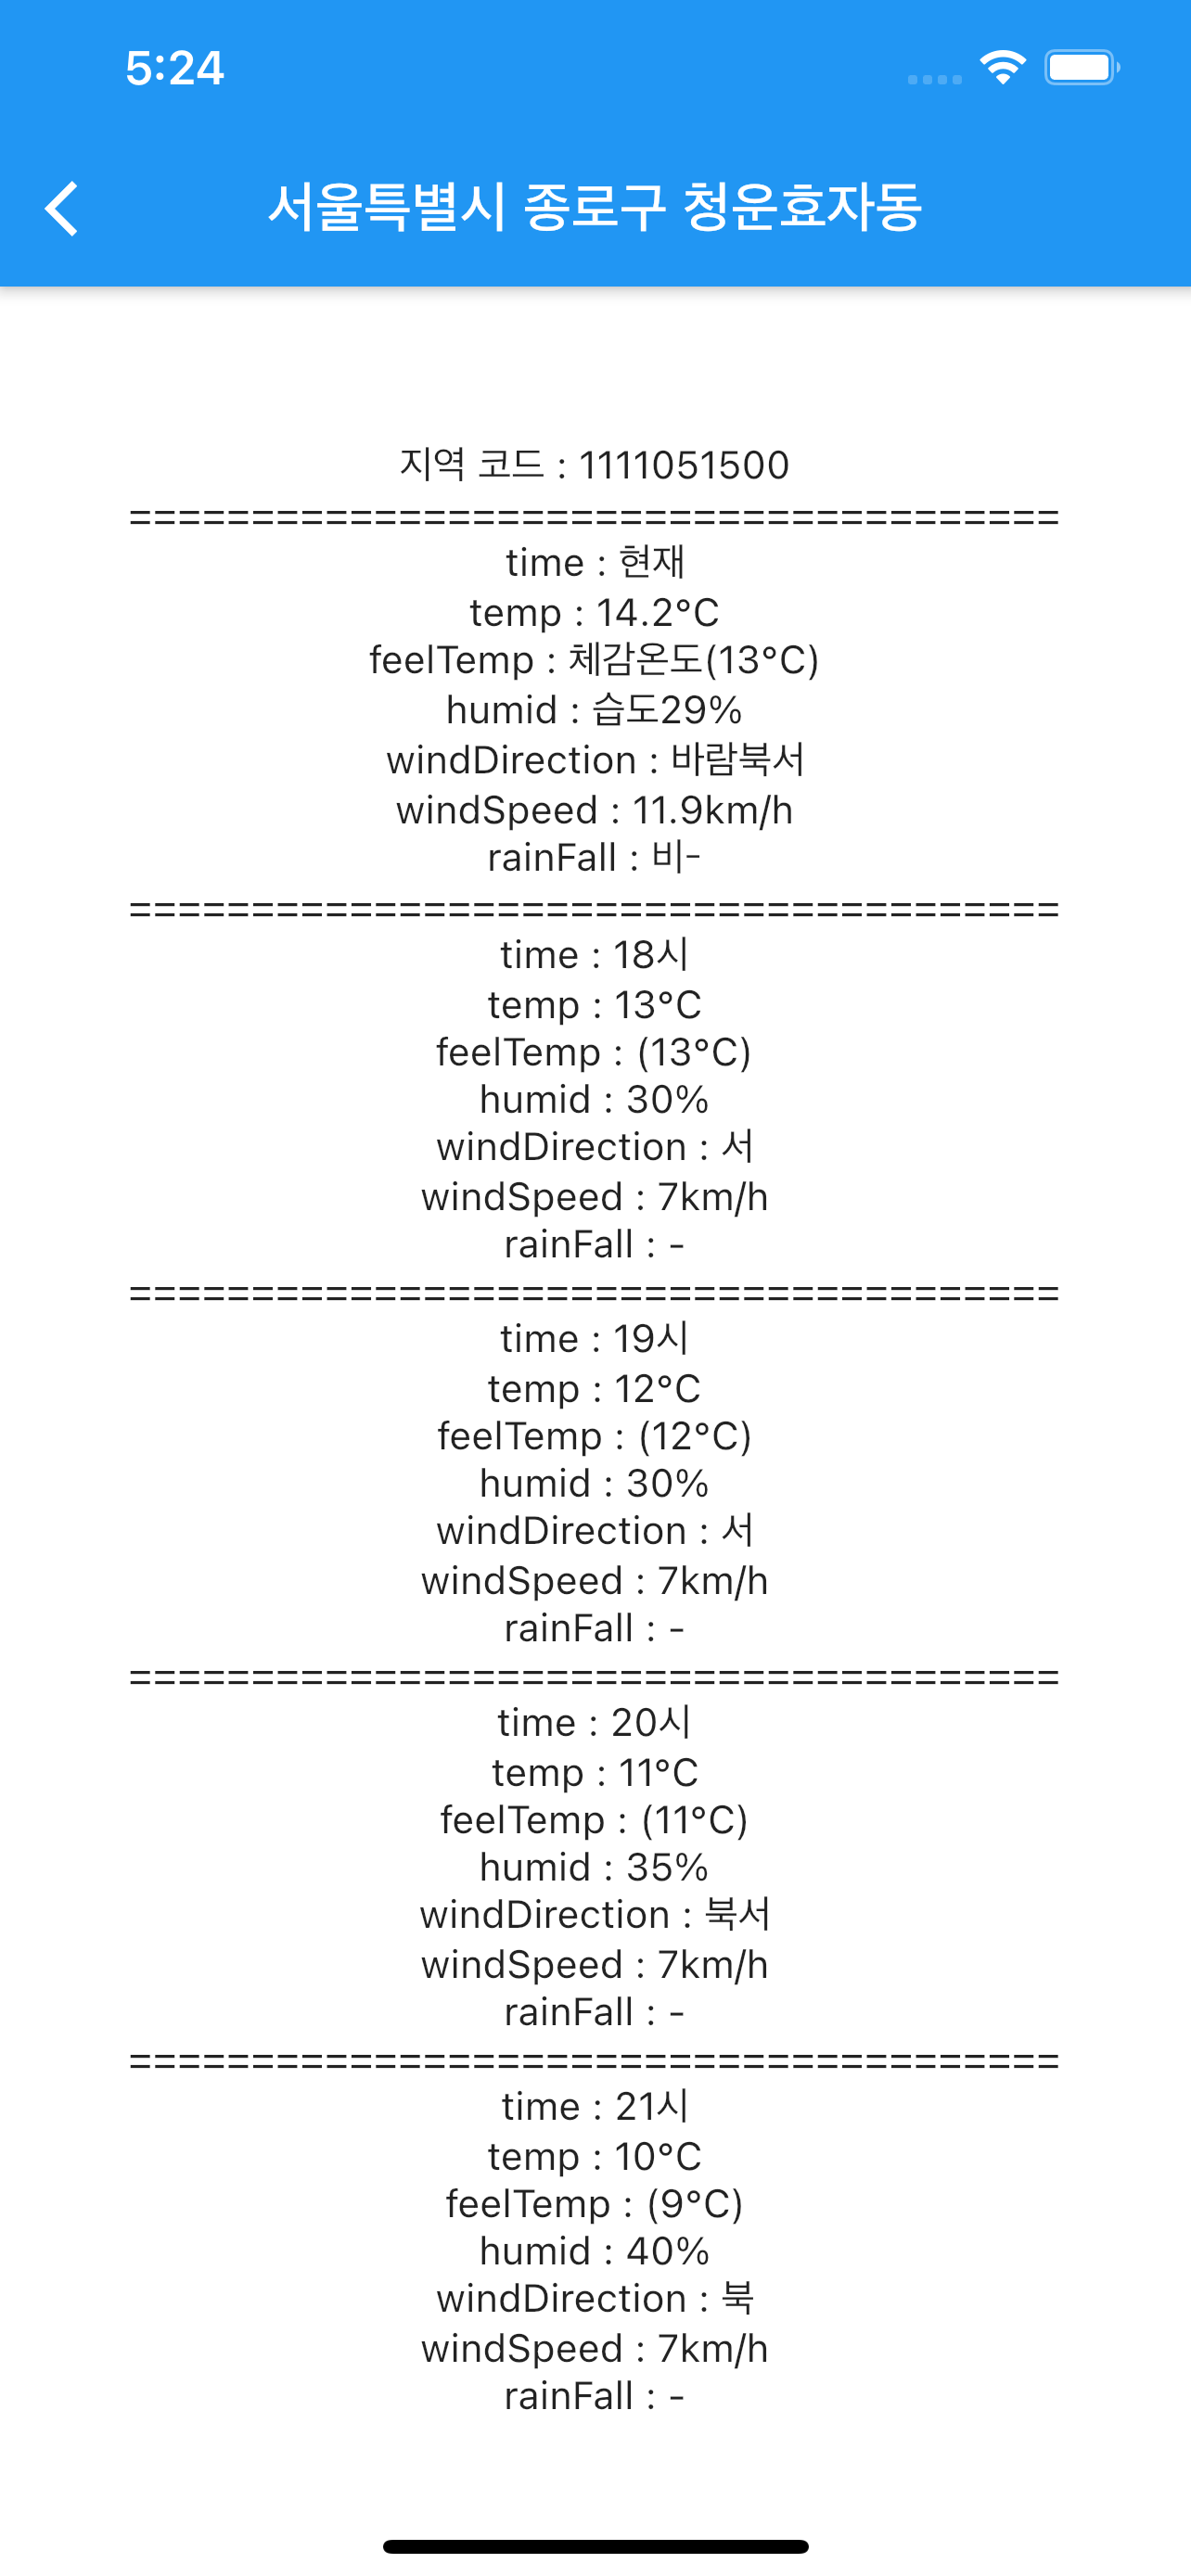 |
먼저 App이 실행되면 메인 페이지가 제일 먼저 보이고 메인 페이지의 우측 상단에 돋보기를 클릭하면 Search 페이지로 옮겨진다. 여기서 자신이 원하는 지역을 클릭하면 Result 페이지로 넘어가서 최종적으로 해당 지역의 날씨 데이터가 출력되는 형식이다. 따라서 날씨 데이터의 흐름은 다음과 같이 흘러야 한다.
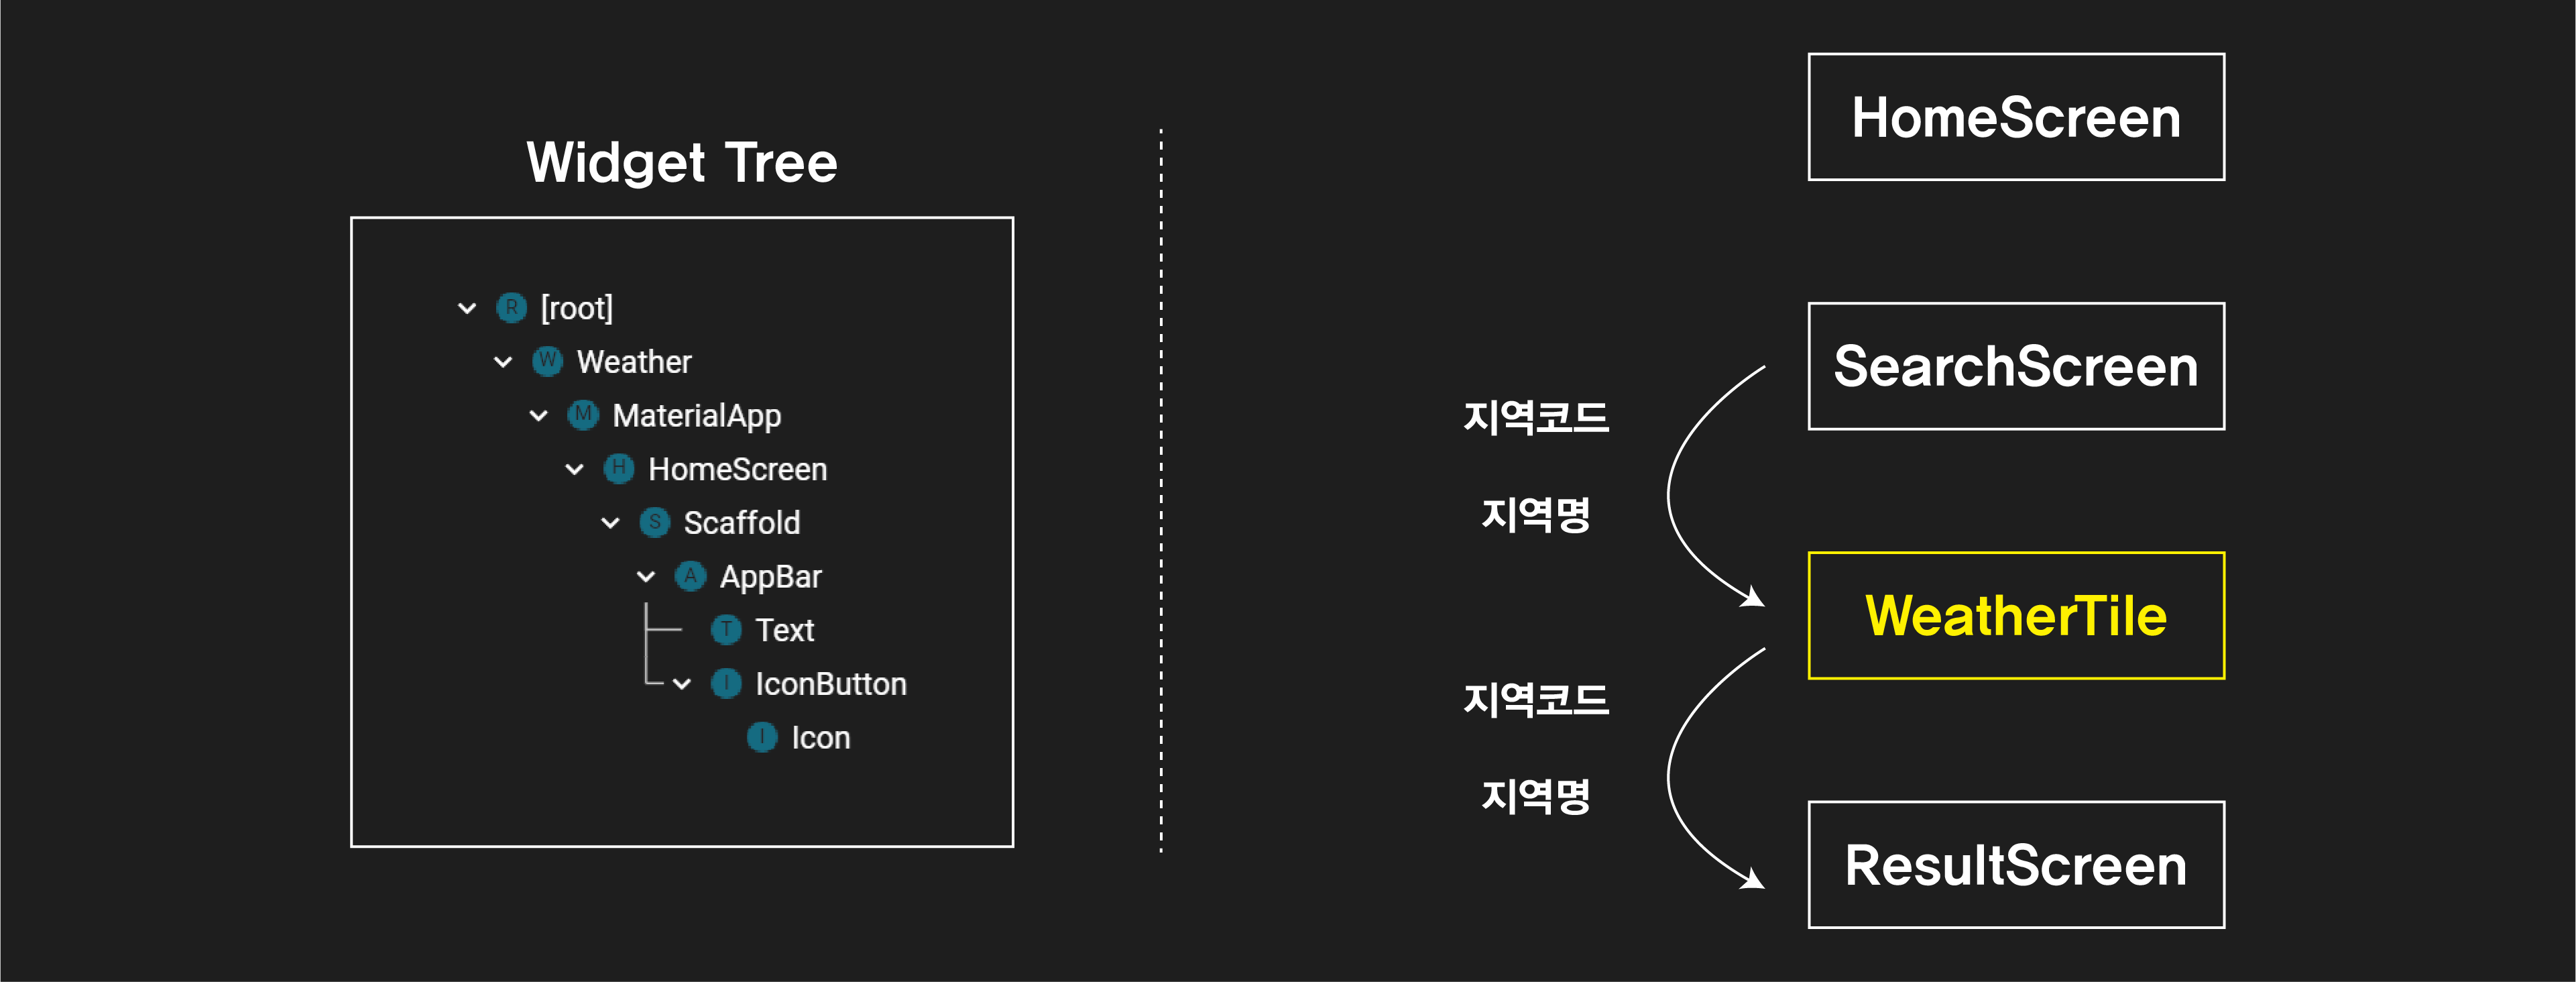
따라서 SearchScreen에서 지역코드와 지역명을 WeatherTile로 보내주면, WeaterTile에서 다시 ResultScreen으로 해당 데이터를 넘겨주어야 한다. 그리고 최종적으로 ResultScreen에서 initState에 의해
지역코드를 활용한 기상청 데이터 파싱이 이루어진다.
1
2
3
4
5
6
7
8
9
10
11
12
Expanded(
  child: ListView.builder(
    padding: const EdgeInsets.all(8),
    itemCount: filterLocationList.length,
    itemBuilder: (BuildContext context, int index) {
      return WeatherTile(
        weatherList: filterLocationList,
        index: index,
        locationDictionary: weatherLocation,
      );
    },
  )
따라서 위의 코드를 통해 WeatherTile을 통해 넘겨준다. 사실 지역코드와 지역명만 불러오는게 더 깔끔한 코드이지만 혹시 모를 불안함에 코드와 지역명 전체 List를 보내줬다. 그리 좋은 코드는 아니니 보시는 분들은 감안해주길 바란다.
1
2
3
4
5
6
7
8
9
10
11
12
13
Widget build(BuildContext context) {
    return Card(
      child: ListTile(
        title: Text('${weatherList[index]}'),
        onTap: () {
          Navigator.push(
              context,
              MaterialPageRoute(
                  builder: (context) => WeatherScreen(
                        locationName: weatherList[index],
                        locationCode: locationDictionary.values.toList()[index],
                      )));
        },
그런다음 WeatherTile에서 Navigator.push를 통해 WeahterScreen으로 지역명과 코드를 보내준다.
1
2
3
4
5
6
7
8
9
10
11
12
13
14
15
16
17
18
19
20
21
22
23
24
25
26
27
28
29
30
31
32
33
34
35
36
37
38
39
40
41
42
43
44
45
46
47
48
49
50
51
52
53
54
55
56
57
58
59
60
61
62
63
64
65
66
class WeatherScreen extends StatefulWidget {
  static const String id = 'weatherScreen';
  final String locationName;
  final int locationCode;

  WeatherScreen({this.locationName, this.locationCode});

  @override
  _WeatherScreenState createState() => _WeatherScreenState();
}

class _WeatherScreenState extends State<WeatherScreen> {
  List<WeatherInfo> todayweather;
  StreamController<List<WeatherInfo>> streamController = StreamController();

  // initState를 통해 페이지가 build되자마자 geteget()함수가 실행되게 변경.
  @override
  void initState() {
    setState(() {
      getget();
    });
    super.initState();
  }

  // weatherTile에서 받은 locationCode를 이용해 해당 지역의 기상 정보를 불러오는 과정.
  void getget() async {
    todayweather = await getNowWeather(locationCode: widget.locationCode);
    streamController.add(todayweather);
  }

  @override
  Widget build(BuildContext context) {
    return Scaffold(
      backgroundColor: Colors.white,
      appBar: AppBar(
        title: Text(widget.locationName),
      ),
      body: Center(
        // StreamBuilder를 통해 Null Safety를 적용해주는 과정
        child: StreamBuilder<Object>(
            stream: streamController.stream,
            builder: (context, AsyncSnapshot snapshot) {
              if (!snapshot.hasData) {
                return Center(
                  child: Text('날씨를 불러오고 있습니다.'),
                );
              } else {
                return Column(
                  mainAxisAlignment: MainAxisAlignment.center,
                  children: [
                    Text('지역 코드 : ${widget.locationCode}'),
                    Text('time : ${snapshot.data[0].time}'),
                    Text('temp : ${snapshot.data[0].temp}'),
                    Text('feelTemp : ${snapshot.data[0].feelTemp}'),
                    Text('humid : ${snapshot.data[0].humid}'),
                    Text('windDirection : ${snapshot.data[0].windDirection}'),
                    Text('windSpeed : ${snapshot.data[0].windSpeed}'),
                    Text('rainFall : ${snapshot.data[0].rainfall}')
                  ],
                );
              }
            }),
      ),
    );
  }
}
마지막으로 WeatherTile에서 받은 데이터를 사용해서 WeatherScreen 페이지에서 기상앱을 불러옴과 동시에 화면에 보여주면 되는 것이다.
6. 느낀점.
그렇다면 위 코드를 보고 무엇을 느꼈는가? 지금은 받아야하는 데이터가 지역명과 지역코드밖에 없었지만 받아야하는 데이터가 10개, 100개로 늘어난다면 매우 비효율적인 코드가 될 것임을 쉽게 상상할 수 있다.
그렇다면 어떻게 효율적으로 개선할것인가를 생각하는게 당연하다. 나는 State Management개선 방안으로 Provider와 get을 쓰기로 했고 이 방법이 궁금하다면 다음 포스팅을 보도록 하자.
reference
- https://github.com/Rahiche/flutter_jobs_app/blob/master/lib/JoblistScreen.dart
- https://itnext.io/write-your-first-web-scraper-in-dart-243c7bb4d05
- https://medium.com/flutter-community/parsing-html-in-dart-with-html-package-cd43c29cc460
- https://flutter-ko.dev/docs/cookbook/networking/fetch-data
- https://stackoverflow.com/questions/60262715/a-value-of-type-futurelistquestion-cant-be-assigned-to-a-variable-of-type